FAQ
Below you will find a collection of frequently asked questions and their corresponding answers to assist you in case of any uncertainties. This section is reviewed regularly and updated as needed to ensure the information remains current and relevant.
What is the difference between archiving and deleting an employee?
In TimePunch, there are several ways to handle data from former employees: Archive, Terminate, or Delete. The Archive and Delete options have different effects on the availability and integrity of employee data.
Employee archiving:
- Data retention: When archiving, all employee data is preserved. This allows you to access historical working time data, project assignments, and other relevant information even after the employee has left the company.
- Access rights: Archived employees usually lose their access to the system. However, their data remains visible and accessible to administrators or authorized users.
- Recovery: If the employee returns to the company or their data is needed again, the archive can usually be reactivated, restoring access to the data.
Employee delete:
- Deleting an employee results in the complete and irrevocable removal of all associated data from the system. This includes work time records, project participation, and other personal information.
TimePunch offers the option to delete historical employee data. According to current legislation, work time data must be retained for 6 or 10 years. To do this, go to the GDPR - Data deletion page.
How do I switch an active employee to inactive?
In TimePunch, you can archive an active employee, effectively marking them as inactive. To do so, follow these steps:
- Login Sign in to your TimePunch system using an administrator account or a user account with the necessary authorizations.
- Open the Employee Profile Navigate to the employee data and locate the individual whose status you wish to change to “inactive” (this can be done via the employee overview). Open the profile of the selected person by double-clicking the corresponding row or by clicking the pencil icon to edit.
- Change the Status In the “Administration” section, under the “Authorization” menu, select “Archived” from the drop-down menu to change the employee's status.
- Save Changes Confirm the changes by saving the updated profile.
An archived (inactive) employee will no longer be able to enter time entries or access the time tracking functions while their status remains “Archived.” If this functionality is unavailable in your version, please contact your system administrator or consult the TimePunch documentation for further details on user administration.
What is the difference between time entries and daily working time?
- Daily working time is the total of all individual entries for a day.
- Time entries are the individual time entries that are used to calculate the daily working time.
Conclusion: Time entries provide a detailed view of the working time, while the daily working time only shows the total result.
Will the reduced times remain in TimePunch?
Reduced times are retained in TimePunch to ensure complete documentation of working hours, absences, and corrections. This helps track errors, create reports, and ensure that payroll is accurate. It is important to review these shortened times regularly to ensure that all adjustments are recorded correctly and can be traced. More on this topic here: Working hour window model
Is it possible to automatically create/record time entries?
TimePunch offers flexible options for automatically recording work hours. This can be done using software features like the Watcher, integrating hardware such as RFID terminals, or setting up recurring entries for repeated time periods. The best method depends on your company’s specific needs and setup.
Can the month-end closing be reversed?
The recommended way to reverse a month-end closing is to roll it back to the previous month. For example, if you need to make changes to entries in February, simply set the month-end closing date back to the end of January. This will allow you to edit February again. There's no need to use the "Unlock all" option in the month-end closing dialog to open all months. Use this option with caution, as it can compromise the integrity of already closed periods.
Employee was created, holidays were forgotten
If employees were created before holidays were added in the Holiday Editor, you can still assign the holidays later. To do this, go to the employee’s profile, open the Basic data tab, and update the Public holiday calculation section.
Can I set up shift rotations for employees?
It is possible to create multiple working time models for the same employee. However, the system currently does not support automatically alternating between these models.
Why is a created employee not displayed?
If a newly created employee doesn’t appear in TimePunch’s time tracking, there could be several possible reasons. Here are a few steps you can take to identify and resolve the issue:
Check the employee profile
- Activity status:
Make sure the employee is marked as active. In the employee overview, you can use the Show active employee profiles switch to display only active profiles. - Start date:
Verify the start date listed in the employee’s profile. If the start date is in the future, the employee may not yet be included in time tracking. - Group membership:
Ensure the employee is assigned to the correct group, department, or branch. Group membership determines which managers approve absence requests and can affect visibility in time tracking.
- Activity status:
Check authorizations and roles
- User rights:
Confirm that the logged-in user has the necessary permissions to view the employee in time tracking. A user's role (e.g., team leader, department head) may affect their visibility of employees.
- User rights:
Check time tracking settings
- Time tracking mode:
Ensure the correct time tracking mode is set for the employee (e.g., TimePunch Watcher, Terminal, Online). An incorrectly configured mode can prevent the employee from appearing in time tracking. - Project assignment:
Check that the employee is assigned to a project. Without a project assignment, time tracking cannot be started properly.
- Time tracking mode:
Technical checks
- Software version:
Ensure you are using the latest version of TimePunch. Outdated versions may cause display issues. - Restart the system:
Sometimes, restarting your system or the TimePunch application is necessary for new employees to appear correctly.
- Software version:
Contact support
If the employee still does not appear after completing these steps, please contact TimePunch support for further assistance.
Can I manage employees without time recording—only vacation?
Yes. With the following configuration, an employee can be managed in TimePunch exclusively for vacation tracking, without recording working hours or calculating target hours.
- Customize the working time model
Open the employee’s profile and navigate to the “Working time model” tab.
For each day of the week:
• Set “Working time (hours)” to “0”. This ensures that no target hours are calculated and the employee is excluded from standard time tracking. - Disable time recording access (optional) Go to the “Administration” tab in the employee’s profile and remove relevant user permissions or leave the start password unset.
- Enter vacation entitlement In the “Work regulations” tab, define the employee’s annual vacation entitlement.
- Set pro rata vacation (if starting mid-year) If the employee joins during the year, enter the proportional vacation days in the “Entry data” tab of the profile.
- Record vacation manually
Vacation bookings can be made manually, even without active time tracking:
- Create a new entry in the calendar with the activity “Vacation”.
- Select the specific days the vacation should apply to.
Additional notes Leave requests: You can decide whether the employee submits vacation requests themselves or whether the supervisor handles this process. Other absences: You can also manage other absence types such as sick leave or special leave via the vacation module. Notifications: Ensure that employees receive notifications regarding leave requests, remaining vacation days, and approvals.
How can I print a log of the changes?
TimePunch does not offer a direct option to print the change history from the user interface.
As an alternative, you can configure automated email notifications for changes to time entries in the Settings section of TimePunch.
This feature sends notifications to specified recipients whenever changes are made, providing an additional way to monitor the change history.
How can I restrict a flexitime account?
To restrict a flexitime account in TimePunch, you can usually set the maximum and minimum hours for an account. Here are the steps you can usually follow to configure these restrictions - Working time regulation
How can I update my vacation calculation?
TimePunch provides several options for accurately recording and updating vacation entitlements. Below are structured instructions for three common scenarios:
Calculating Vacation for New Employees
- Log in
- Sign in to TimePunch using administrator or manager credentials.
- Select an Employee
- Go to the “Employees” tab.
- Open the desired employee’s profile by double-clicking it or clicking the pencil icon.
- Enter Vacation Entitlement
- In the “Basic Data” tab, enter the remaining or prorated vacation days.
- This is applicable for employees who joined mid-year or whose vacation balance was carried over from the previous year.
- These entries serve as the foundation for automated vacation tracking.
More details: Vacation Calculation
Manually Adding a Vacation Request
- Log in
- Sign in to TimePunch using administrator or manager credentials.
- Select Employee & Open Daily Entries
- Sign in to TimePunch using administrator or manager credentials.
- Navigate to “Monthly Working Time.”
- Select the employee and click “Create Daily Entries.”
- Enter Vacation Manually
- Choose the activity “Recreational Leave” from the “Requested Absence” project.
- Enter the vacation period. Start and end dates will automatically adjust based on the employee’s working time model.
- Check the Report
- Go to “Annual Vacation and Sick Leave.”
- Under Reports > Vacation Overview per Month, you can view vacation days in a table format.
More details: Entering holiday and sickness
Automatic Vacation Tracking via Approved Absence Requests
Once a vacation request is approved by an authorized person, TimePunch automatically logs the vacation and reflects it in the “Vacation and Sickness” overview.
This is the recommended method to reduce manual entry errors.
Notes & Tips
- Always follow your company’s internal policies and legal requirements when calculating vacation.
- Use automated processes whenever possible to ensure data accuracy.
- If an employee joins mid-year, their vacation entitlement is calculated on a prorated basis.
- You can assign an expiration date to unused vacation days to comply with company deadlines.
Is there a way to change the time format from 24-hour to 12-hour in TimePunch?
No, TimePunch currently does not offer an option to switch from the 24-hour time format to a 12-hour (AM/PM) format.
The software uses the 24-hour format by default.
Which server address should I use for TimePunch Watcher?
Follow these steps:
- Check your email
- When your system is set up in the TimePunch Cloud, you will usually receive the server address by email.
- Example
- A typical server address looks like this: yourSubdomain.timepunch-hub.com/TimePunch
- Configure TimePunch Watcher
- Open TimePunch Watcher and go to Settings.
Enter the server address there to establish the connection.
- Open TimePunch Watcher and go to Settings.
How do I add vacation to my calendar?
After your leave request is approved, you'll receive a confirmation email.
The email includes an attached .ics file that you can import directly into your Outlook calendar.
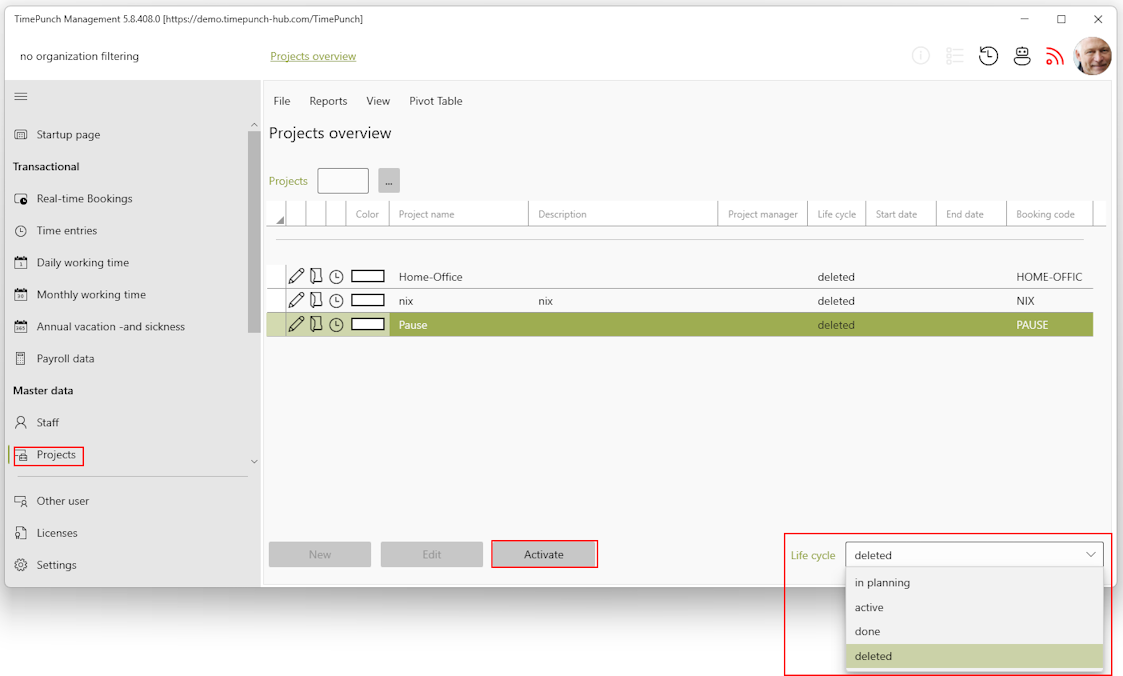
Can a deleted project be restored?
- Open the “Projects” menu.
- In the lower section of the window, locate the “Life Cycle” dropdown menu and select “Deleted”.
- A list of all deleted projects will be displayed.
- Select the project you wish to restore and click “Activate”.
- The project will now reappear in the list of active projects.
Note: This feature is only available to users with administrator or project manager permissions.
How do I configure the project assistant?
- Open project Navigate to the master data in TimePunch and select the desired project. Open it for editing.
- Select “Access rights” tab Switch to the “Access rights” tab in the project window.
- Add or edit person Add the person in question or edit the existing settings by double-clicking on the name.
- Assign “Project assistant” role In the dialog that appears, you can assign the “Project assistant” role to the person. This role makes it possible to evaluate project times without making administrative changes to the project.
- Make specific adjustments (optional) You can define specific settings such as the individual worklist for the person. These adjustments are also made in the dialog under the “Access rights” tab.
- Save changes Confirm the settings you have made and save the changes.
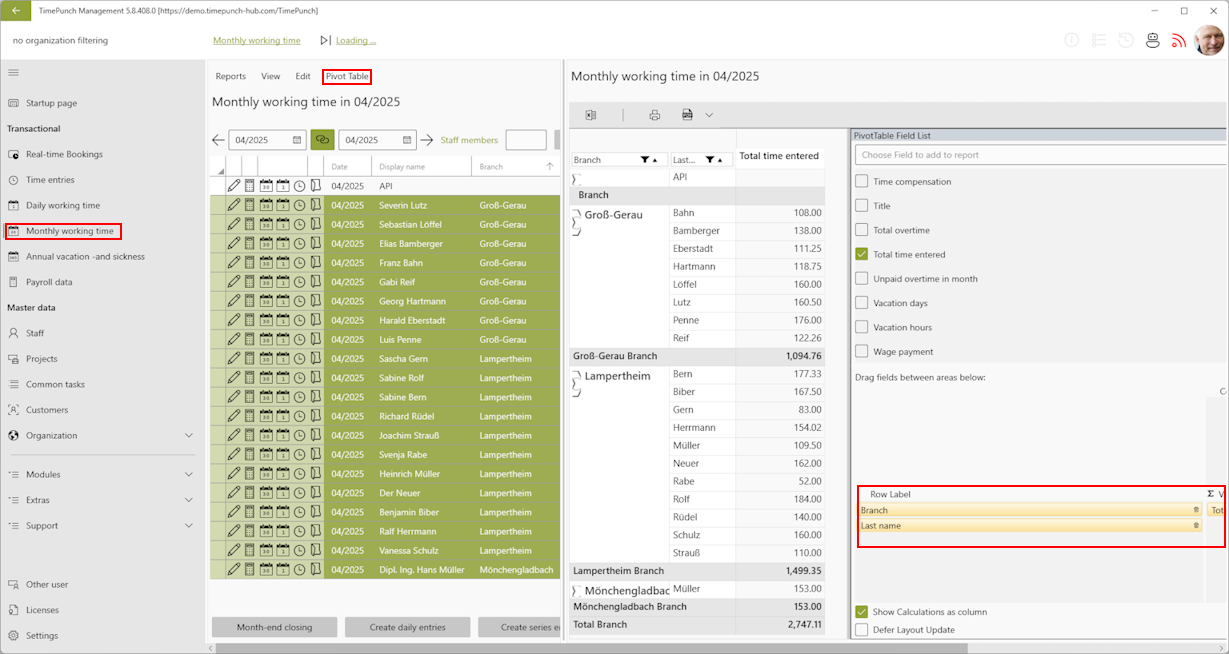
How can I view the total monthly hours for a branch, department, or team?
To easily and individually query and analyze monthly or daily working hours, you can use a pivot table. Pivot tables can be created on nearly any page that displays tabular data.